Installing
Windows Server 2012 (step by step)
Windows Server 2012, codenamed "Windows Server
8", is the sixth release of Windows Server. It is the server version of
Windows 8 and succeeds Windows Server 2008 R2. Two pre-release versions, a
developer preview and a beta version, were released during development. The
software was generally available to customers starting on September 4, 2012.
In this easy step by step guide, we will learn how to
install and activate Windows Server 2012.
Before you start make sure you have the minimum
requirements to install Windows Server (Windows Server
Requirements):
Processor: Minimum:
1.4 GHz 64-bit processor
Ram: Minimum: 512 MB
Disk Space: Minimum: 32 GB
Other requirements:
Ram: Minimum: 512 MB
Disk Space: Minimum: 32 GB
Other requirements:
- DVD drive
- Super VGA (800 x 600) or higher-resolution monitor
- Keyboard and Microsoft® mouse (or other compatible pointing device)
- Internet access
You can then download the evalution copy of Windows
Server 2012 from here, Download the ISO and burn it to some DVD:
http://technet.microsoft.com/en-US/evalcenter/hh670538.aspx?ocid=&wt.mc_id=TEC_108_1_33
http://technet.microsoft.com/en-US/evalcenter/hh670538.aspx?ocid=&wt.mc_id=TEC_108_1_33
Now that we have everything we need, We can Start:
1- Insert the Windows Server 2012 DVD, and once you get
the following message press Enter to boot from the setup


2- Wait for a while till the setup loads all necessary
files (Depending on your machine, it will take couple of minutes)


3- Once the setup files are loaded, the setup will
start with the following screen. You can change these to meet your needs (the
default values should be fine for now)


4- Once you click Next, you can start the installation,
click "Install now"


5- You will see the following screen, wait until it
finishes loading


6- In the following setup screen, you will see four
options. Select Windows Server 2012 DataCenter Evaluation (Server With GUI).


7- After you click Next from previous screen, Read the
License terms, tick the "I accept the license terms" and click Next


8- Now It will ask you for the drive (or partition) you
want to install Windows on. Here I'm installing it on the one partition I have
here. NOTE: This will remove the content of the partition. Either you create a
partition to install windows on, or you can test this on a testing machine


9- Now once we picked our partition, clicking on next
from previous screen will start the setup. This process might take a while.


10- Once the setup is done, it will restart and start
your Windows Server 2012 for the first time. It will ask you then to set up a
password for the Administrator user


11- The setup will finalize your settings, might take a
couple of minutes

12- Once the setup is done, you can log in for the first time to your Windows Server, as the screen says, press Ctrl+Alt+Delete to log in, and use the password you set in the setup process

13 - Once you Log in, Windows Server 2012 will show the Server Manager


12- Once the setup is done, you can log in for the first time to your Windows Server, as the screen says, press Ctrl+Alt+Delete to log in, and use the password you set in the setup process

13 - Once you Log in, Windows Server 2012 will show the Server Manager

Congratulations! you have now Windows server 2012
Installed with Datacenter.
Step-by-Step Guide for Setting Up A Windows Server 2012 Domain Controller
In Windows Server 2012, dcpromo has been
deprecated.

In order to make the windows server 2012 domain controller we
will install ADDS (Active Directory Domain Services) role from the server
manager on Windows Server 2012.
First we will change the server name let say server2012dc and the IP address 10.10.21.1 (try to
avoid using default 192.168.0.1)


“Before You Begin” screen provides you basic information such as
configuring strong passwords, IP addresses and Windows updates.

On Installation Type page, select the first option “Role-based or
Feature-based Installation“.
Scenario-based Installation option applied only to Remote
Desktop services.

On the “Server Selection” Page, select a server
from the server pool and
click next.

To install AD DS, select Active Directory
Domain Services in turn it will
pop-up to add other AD DS related tools. Click on Add Features.

After clicking “Add Features” above, you will be able to click
“Next >” as shown in the screen below.

On the “Select Features” Page, Group Policy Management feature automatically installed during the promotion.
Click next.

On the “Active Directory Domain Services” page, it gives basic
information about AD DS. Click Next.

On the “Confirmation” Page, You need to confirm this to continue
with this configuration. It will provide you an option to export the
configuration settings and also if you want the server to be
restarted automatically as required.

After clicking “Install” the selected role binaries will be installed
on the server.

After “Active Directory Domain Services” role binaries have been
installed and now it is time to promote the server to a Domain Controller.

TechNet Article:
To create a new AD forest called “ArabITPro.local”, select add a
new forest.

Type the name ArabITPro.local

Specify the FFL, DFL, whether or not it should be a DNS Server
and also the DSRM administrator password. As you can see, it has selected the
GC option by default and you cannot deselect it. The reason for this is that is
the very first DC of the AD forest and at least one needs to be a GC.

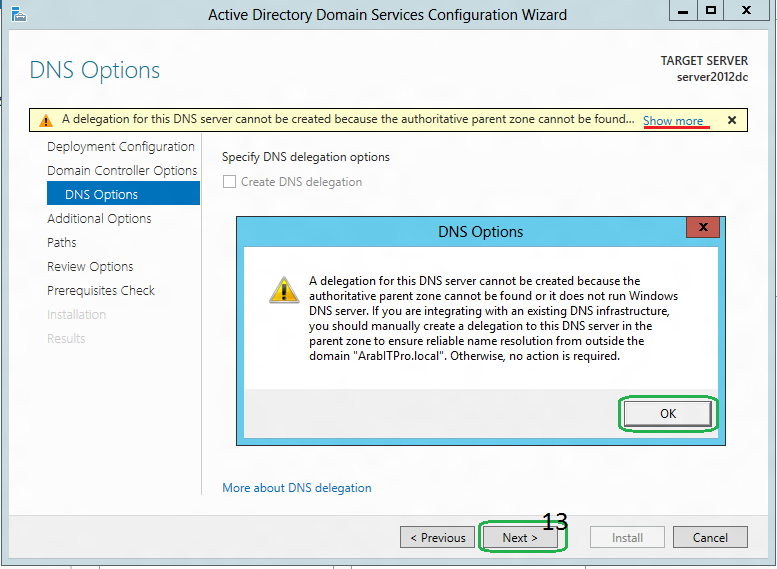
DNS delegation warning.
Checks the NetBIOS name already assigned.

Specify the location of the AD related folders and then
click next.

Summary Of All Installation Options/Selections.

Click View script for single command line PowerShell
script for dcpromo.

Before the actual install of AD, all prerequisites are checked.
If All prerequisite checks are passed successfully then click Install.

When you click Install, DNS and the GPMC are installed
automatically.

After the promotion of the server to a DC finished server
restart automatically.
Once the server is booted and you logon to it, click on
Server Manager | Tools , will notice that following have been installed :
• Active Directory Administrative
Center
• Active Directory Domains and Trusts
• Active Directory Module for Windows PowerShell
• Active Directory Sites and Services
• Active Directory Users and Computers
• ADSI Edit
• DNS
• Group Policy Management
• Active Directory Domains and Trusts
• Active Directory Module for Windows PowerShell
• Active Directory Sites and Services
• Active Directory Users and Computers
• ADSI Edit
• DNS
• Group Policy Management
